


 Ho, ho, ho, Christmas party season is coming! Whether you’ve got office drinks
  As the leaves begin to fall, our thoughts are turning to cosy scarves, pumpkin l
  Pigtails burst onto the catwalk a couple of seasons ago and they’ve been a top
 Hollywood vintage waves with clip-in hair extensions
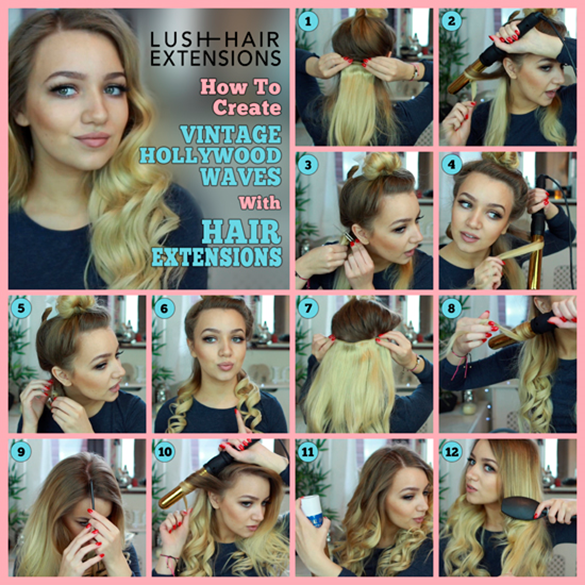
Hollywood vintage waves with clip-in hair extensions
Fancy trying a really beautiful style using your clip-in hair extensions? Maybe you’re new to clip-in hair extensions but want to give them a try for a special event? Or perhaps you want to switch up your style and go for something a bit more glamourous?
Ladies, you need to try these beautiful Hollywood vintage waves. You’ve seen the A-list rocking this look on the red carpet, but we promise it’s a surprisingly easy look for us mere mortals to achieve. As always, the gorgeous Miss Alex is on hand with an expert video to show you the way. This vintage look is perfect for a big night out, wedding or black tie event. Or what the hell, do it for a night down the pub!
First thing’s first, get your equipment together.
You’ll need
● Your clip-in hair extensions (of course!)
● A comb with a long, thin tail for sectioning (or you can use a blunt pencil)
● Clips or bobbles for your sections
● Curling wand or curling iron
● Some curling clips for pinning your curls (optional)
● A backcombing/teasing comb
● A hairbrush
● Hairspray
Got everything you need? Let’s get started.
Clipping your wefts
Start by brushing your hair to make sure it’s smooth. Then you need to start dividing your hair into sections, starting at the bottom. Create a section of hair across the nape of your neck, then clip the rest of your hair on the top of your head so it’s out of the way.
Take your first weft (or go for a stacked weft like Alex, where she clips one weft on top of the other to give extra volume and thickness) and clip it in at your roots. Once you’ve clipped your weft, brush through the section of hair.
Curling
It’s time to curl! If you’ve never done this before it can seem a bit daunting but Alex’s fantastic tips make it really simple. And you’re curling thick sections of hair to create those big Hollywood waves, so it’s also super quick.
Now pay attention, this is an important bit! The key to this look is making sure all your waves flow in the same direction around your head. So, on one side of your face the curls will flow away from your face, and on the other side they’ll fall in towards your face in that beautiful vintage style. ‘How do I do that?’ I hear you cry. Just grab your curling wand or curling iron and read on…
First, pick the side where you want the curls to flow away from your face. Take a thick section of your natural hair and the extensions, place the barrel of your curling wand behind the section, and wrap the hair around the barrel, taking it quite close to the root. Make sure the hair lies nice and flat on the barrel so you get beautiful, smooth waves.
Once you’ve curled the hair on one half of your head, start on the other side, where you want your curls to fall towards your face. For this half, place the barrel in front of the section you are curling to make the curls flow forwards. Have a look at Alex’s video and it’ll all make sense!
Clipping your curls
Top tip from Alex alert! This is optional, but if you want to make sure your curls cool down in the right position, gently catch them in your hand when you take the curling wand away, curl it back up to your roots and clip it in place using your curling clips.
Once you’ve curled the whole bottom section of your hair, let the curls cool down for a couple of minutes (a good excuse to make a cuppa). Then let your curls out and repeat the process with the next layer of hair. Section, clip your wefts, curl, clip and cool. Repeat all the way up the back of your head but leave a good section of hair free on the top of your head to cover your extensions and keep them looking natural
When it comes to the final layer of hair on top of your head, create a side parting (the bigger side should be the side where your curls will fall towards your face) and curl in the same way.
Have a momentary panic at the crazy curly look you’ve created.
Realise there’s still another two steps to go and breathe a sigh of relief.
Brushing out
Now you’ve finished curling and cooling, spray on some hairspray and then grab your hairbrush. It’s time to brush out those curls. This feels a bit scary but don’t worry, you’re not going to brush out all your hard work!
Brush through your waves to make those gorgeous vintage waves you’re after. Keep playing with it and teasing it until you’re totally happy.
Backcombing
To finish off your look, backcomb your roots on the side where your curls are falling over your face to give it some extra volume.
On the other side, where your curls are falling away from your face, keep your roots smooth and sleek.
And there you have it ladies. True Hollywood glamour. Now all you need is some lippy – and maybe a red carpet to show off your look!
If you’ve got any questions or tips you’d like to share, either leave a comment below or hit us up on Twitter, Facebook or YouTube